Insight 
Street Photography with High Dynamic Range
Adapted from HDR Photography Photo Workshop (Wiley)
By Pete Carr, Robert Correll
More Insight articles
Mediabistro On Demand design and photo video tutorials
Street photography is the art of documenting life on the street. The focus is
on people and what they’re doing: crazy holiday shoppers, children being
children (as shown below), protesters protesting, a couple out for a
romantic stroll, or a somber moment.
This photo was tone mapped in Photomatix with a slightly surreal look
for a magical effect. Strength was maximized for detail and Luminosity
was maximized to achieve the glowing look. Reducing Luminosity
to its default makes this photo look much more normal. Micro-smoothing
was raised a bit to combat noise and smooth the texture of the lion.

A young girl drinks out of a fun fountain at a zoo. HDR from a single raw exposure converted to three 16-bit TIFFs. (ISO 100, f/5.6, 1/250 second, Sony 18-70mm f/3.5-5.6 at 26mm) © Robert Correll
|
Caution: Taking photos is not illegal in most places, so don’t be afraid to
stand on the streets of London or New York and document life around
you. Be careful to preserve their editorial nature, however.
If you change the context of the photo for advertising or other types
of commercial use, you may need model releases or other forms of permission.
In the end, you are responsible for checking local laws with regard to taking
and publicly displaying or selling your photographs.
Getting Into the Action
The focus of street photography is often action, as shown below.
This photo captures a protest in Liverpool when
U.S. Secretary of State Condoleezza Rice was visiting.
The scene is stark, dramatic, and intimate. It could not have been
captured from a distance with the same impact. In this case,
a wide-angle lens captured the entire scene at close range.
The bold colors of the American flag stand out, as does the police line.

A crowd protests Condoleezza Rice’s appearance in Liverpool. HDR from a single raw exposure converted to three 16-bit TIFFs. (ISO 800, f/8, 1/30 second, Sigma 10-20mm f/4-5.6 at 10mm) © Pete Carr
|
In Photomatix, Strength was increased and set high to enhance the gritty feel.
Luminosity was set high to bring out the detail in the shadows, mainly the road
and parts of the clouds.
Converting the photo to HDR brings out details not visible in the original.
The police line was dark and faded into the background. It has been accentuated
and contrasts with the texture of the road much more. The sky was enhanced and
is much more powerful, matching the energy of the overall scene.
Overall contrast was increased without losing details in the sky or other areas.
A 430ex external flash was used to light the person with the flag — not the entire scene.
Shooting Up Close and Personal
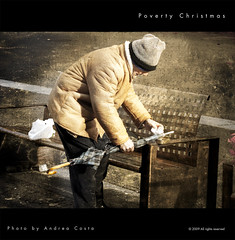
Street photography also documents simpler, often personal moments in public.
It is critical to be unobtrusive in order to photograph these scenes without changing them.
To do that, you must be close to what is happening but remain part of the background.
Note: People in public don’t have the same expectation of privacy as they do
in their own homes, but they still may not want you to take their photo.
Be mindful of this when going out into the streets and taking photos of people.
Photographing children is an especially sensitive matter.
You should ask permission from a parent or guardian prior to taking a
child’s photograph, regardless of the setting.
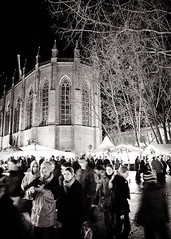
This kind of private moment was captured at the Hillsborough Memorial
beside Shankly Gates at Anfield, Liverpool, and is shown below.
The monument, with its eternal flame, is a reminder of the 96 people
who tragically died during a match between Liverpool and Nottingham
Forest at Hillsborough Football Ground. Before games, fans touch the
memorial as a sign of respect.

A Liverpool Football Club fan pays respects to the 96 who died at Hillsborough. HDR from a single raw exposure converted to three 16-bit TIFFs. (ISO 640, f/4, 1/400 second, Sigma 10-20mm f/4-5.6 at 10mm) © Pete Carr
|
It is hard to photograph such scenes because they are so intensely personal.
The moments and people are real and powerful. When you come up to scenes
like this, try and have a wide-angle lens ready and take your time. Stop, look
, understand what is happening, and decide what you want to say about the scene.
As you wait for the right photo you are also waiting for acceptance. This close,
people know you are taking photos. Without saying a word, you want to establish
a comfort zone with the people you are photographing. If anyone has a problem
with you, they will let you know right away. If no one says anything within a few
minutes, that means they have most likely relaxed and accept your presence.
HDR helps in these situations because you aren’t forced to rely on a flash.
Capture one solid shot in raw and use the single-exposure techniques
illustrated throughout this book to create HDR. In this case, Strength
was set high to enhance details in the scene and Luminosity was set
quite high to bring out details in the clouds while retaining detail in
the woman’s face. Additional Micro-smoothing helps control noise
and the tone-mapping effect. The image was converted to black and
white as a final step in the process to match the overall mood and subject.
Camera Settings
Street photography is a dynamic affair. As such, your camera
settings must be ready to work in a fast-paced environment.
Here are some general guidelines for shooting street photography for HDR:
- White balance. This is best left on auto, especially if you are
- shooting in raw, because with raw, you set the white balance later during raw conversion.
- Shutter speed. A good rule of thumb is to keep the bottom number of the shutter speed fraction at or above the focal length you are using. For example, at 70mm, use a shutter speed of 1/80 second or faster. If you are shooting fast action or in bright conditions, a higher shutter speed may be necessary, even if you boost the ISO.
- Aperture (f-number). In general, start out at f/8 and focus on infinity. You’ll have a good depth of field, an aperture that lets in a fair amount of light, and be able to shoot without worrying about whether everyone is perfectly in focus or not. If you want to isolate the subject, shoot with a larger aperture (smaller f-number). This blurs the background.
- ISO. Keep the ISO as low as practical, but HDR street photography generally requires higher ISO settings than standard HDR photography. It’s all about motion. A slightly higher ISO guarantees a faster shutter speed. It’s less of an issue on a bright sunny day, but on an overcast day there is a chance for blurring because with less light, the shutter speed will be slower. Therefore, increase the ISO on overcast days, in alleys, and other darker settings to make sure that everyone is frozen with no blur. 214
- Raw. If possible, shoot in raw. Raw files preserve a greater dynamic range than JPEGs and allow you to make more effective white balance and exposure adjustments in software.
- AEB. AEB is nearly impossible to use in street photography. There simply isn’t enough time to get off three exposures in the split second you have. Set up for the best overall exposure without blowing out highlights and rely on shooting in raw and processing singleexposure HDR.
- Filters. Depending on the horizon, filters can be useful in HDR street photography because they can protect against blowing out the sky.
Tip: Check your camera’s noise reduction options when shooting at high ISOs.
If noise reduction is immediately applied (as is possible with the Sony Alpha
300 series, for example), your practical shooting speed may be dramatically
slowed because of the processing delay. If that is the case, turn in-camera
noise reduction off and apply it later in software.
The photo below was shot from the hip with the aforementioned
guidelines in mind. There was no need to look in the viewfinder
because at f/8 and focus at infinity, the depth of field (and hence the depth of focus)
was large enough to capture the subjects sharply. The ISO was raised to
1600 because clouds kept passing in front of the sun, darkening the scene.
The high ISO necessitated a fast shutter speed to avoid completely overexposing
the image, but even at 1/6400 second, some areas of the photo are blown out.
As is sometimes the case, however, this photo works despite the blown out areas.
Attempts to reduce their effect make the girl look much worse.
The focal length was 18mm, just wide enough to capture the girl in front.
10mm would have been too wide.

This is a scene at the Mathew Street Festival, Liverpool. HDR from a single raw exposure converted to three 16-bit TIFFs. (ISO 1600, f/8, 1/6400 second, Sigma 10-20mm f/4-5.6 at 18mm) © Pete Carr
|
HDR has brought out details in the clouds and road by increasing the
Strength setting in Photomatix to enhance the detail. Luminosity
was set quite high to bring out details in the darker areas without
blowing out the lighter. Finally, the photo was converted to black
and white as homage to the discipline of street photography,
which traditionally is shot or presented in black and white.
Note: Technically, focusing your lens to a distance called the
hyperfocal distance guarantees you the largest depth of field
for the specific combination of the f/number and lens you are
using. Street photography requires that you be ready at a
moment’s notice, however, so you may not have time to consult
charts, iPhone applications, or other depth of field aids.
More information on hyperfocal distance is available here.
Wide-angle Street Photography
There’s nothing like getting into the action and shooting wide-angle street
photography with a good wide- or ultra wide-angle lens. Look for something
in the range of f 10-24mm and bring your confidence. You will need to get
close to your subjects — sometimes only a few feet away, as shown
below, where a wide-angle lens at 10mm captured the action but
required being virtually in the surf. A larger focal length, 50mm for
example, would have limited the view and been too tight.
Moving back to increase the view would have shrunk the
kids and introduced other distracting elements into the photo.

Kids run from a big wave during a stormy day. An ND filter was used to preserve highlights, and HDR enhances the detail and contrast. (ISO 640, f/8, 1/400 second, Sigma 10-20mm f/4-5.6 at 10mm) © Pete Carr
|
HDR was used for this photo to bring out details in the sky and
water, but not at the expense of contrast. In Photomatix, Luminosity
was set high to retain detail in the water while bringing out detail in
the clouds. Strength was set high to enhance the dramatic look of the clouds.
Microsmoothing helped reduce noise.
Finally, the HDR image was converted to black and white.
There was very little color to begin with, actually.
The day was dull and gray and the seawater was murky and
light brown. While HDR brought out details in the sky and water,
the black-and-white conversion increases contrast so that certain
elements, such as the child’s face and the water splashing to the left, stand out more.
Note: Different focal lengths emphasize different aspects of street
photography. Wide-angle lenses (10-24mm) allow you to get close
but capture a great deal. At the extreme end (between 50 and 70mm), midrange
zoom lenses allow you to be farther away from the action and zoom in for details.
The middle ground (between 24 and 50mm) forces you to get closer to capture the moment.
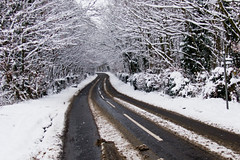
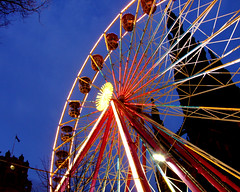
Another good example of wide-angle street photography can be seen below,
prior to processing into HDR. In this case, the scene shows a snow storm on
Princes Street in Edinburgh, Scotland, at night. It is not a bad photo, but the
snow is not as apparent as it could be, nor are there any details in the large
gothic building to the left of the wheel. Shooting at 10mm allows the crowd,
traffic, Ferris wheel, and architecture to all be seen. At 50mm, the focus
would have been on someone specific: a face in the crowd.

This scene of Princes Street in Edinburgh, Scotland is before processing into HDR. (ISO 1600, f/4, 1/15 second, Sigma 10-20mm f/4-5.6 at 10mm) © Pete Carr
|
After processing this single raw exposure into HDR, the snow takes on a larger
role in the sky and there are obvious details in the building, as you can see
below. In Photomatix, Strength was lowered and Micro-smoothing was raised
to keep the photo more realistic. Luminosity was raised to help bring the
snow out from the background. Artistically, the colors, while still apparent, are desaturated.

The same image of Princes Street in Edinburgh, Scotland from 9-6 after conversion to HDR from one raw exposure converted to three 16-bit TIFFs. (ISO 1600, f/4, 1/15 second. Sigma 10-20mm f/4-5.6 at 10mm) © Pete Carr
|
Mid-range Zoom Photography
Midrange zoom lenses are great for walking about. They range from
around 17-55mm or 24-70mm. The great thing about these lenses
is that you can be standing next to someone and shoot at 24mm
and then quickly zoom to something farther away if you need to
and shoot at 70mm.
A street scene of a driving rain storm is shown below before
processing. Notice the lack of details in the trees and buildings in the background.

This shows a torrential rain in Liverpool prior to HDR processing. © Pete Carr
|
HDR is used subtly below to bring out detail and contrast — in a different
way than for landscapes or buildings where you often want to maximize
detail. HDR can cause people to look unnatural, so a light touch is most
often best. In fact, it is often good to set Micro-smoothing to at least 15
and keep the Strength and Luminosity at lower levels than normal. In
addition, HDR brings out details of the rain, emphasizing the terrible
weather and the rain-soaked street. Saturation was enhanced in
Photomatix, but could also have been increased in further post-processing.

This shows the HDR image that was created from one raw exposure converted to three 16-bit TIFFs. (ISO 1600, f/2.8, 1/100 second, Canon 24-70mm f/2.8 at 70mm) © Pete Carr
|
Tip: To retain a level of normalcy with people in street photos, take the original 0EV exposure and paste it as a new layer on top of the tone-mapped image in Photoshop or Photoshop Elements. Set the non-HDR 0EV photo layer to Soft Light blending mode and experiment with opacity.
The photo below shows the opposite end of the midrange zoom lens. This was taken standing next to a hot dog vendor. It was shot at 32mm, which is really the perfect focal length for this situation. It was not necessary to zoom in, and a wide-angle lens would have captured too much. The shot needed to be close and intimate in order to capture the people, the stand, steam, and sun. Notice the combination of a wide-open aperture, which limits depth of field but also increases the amount of light entering the camera, and the fast shutter speed which was necessary to shoot toward the sun, which is behind the stand top-center of the frame. Although promising, this unprocessed photo has very little detail in the buildings to the side and the main subjects are in shadow.

A 32mm focal length was used to shoot this scene of a hot dog vendor, shown here before HDR processing. (ISO 100, f/2.8, 1/1000 second, Canon 24-70mm f/2.8 at 32mm) © Pete Carr
|
After processing a single raw photo into HDR, as shown below, there are more details in the image, such as the rising steam. This helps balance the image. If the exposure had been increased in a raw editor alone, these areas would likely have been blown out and lost. Although there are spots on the edge of blowing out, HDR enhanced the darker regions without overly compromising the lighter ones.
In Photomatix, Luminosity was set quite high to keep the highlights from being too blown out. The sun backlighting the steam rising from the vendor’s cart is very bright. This also brought out detail in the darker areas. Strength was increased to medium to enhance those details but not so much to create an overly processed image.

The image above after processing to HDR, which really brought out the details. HDR from a single raw exposure converted to three 16-bit TIFFs. (ISO 100, f/2.8, 1/1000 second, Canon 24-70mm f/2.8 at 32mm © Pete Carr
|
Using a Compact Digital
Despite their power, dSLRs are not always the best camera for street photography. To be blunt, they can be large, clunky, and can draw too much attention to you. Henri Cartier-Bresson used a Leica because of its small size and quiet operation. It was unobtrusive and hardly noticeable.
Today, compact digital cameras, such as the Canon G9 or G10, are closing the gap between the dSLR and cameras with a much broader appeal. They can shoot in raw and have high ISO performance. They are small, light and quiet, do not have large lenses, can zoom in to moderate levels, and can fit in your pocket. They are good for HDR street photography with two real issues: They have limited wide-angle capability, as you generally can’t go under 24mm; and they have high ISO noise, which simply isn’t on par with any dSLR on the market. You may struggle over ISO 400 or 800.
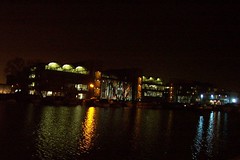
The photo below was taken with a Canon G9. There is a little more noise to contend with at ISO 200 than a professional-level dSLR because of the camera’s smaller sensor, but in situations where you would rather look like a tourist than a photographer — it’s the ideal solution.

This cafe on Falkner Street in Liverpool was shot with a compact digital camera. HDR from a single raw exposure converted to three 16-bit TIFFs. (ISO 200, f/5, 1/250 second, Canon G9 digital compact camera) © Pete Carr
|
The sky now balances the street as they move toward one another in the far background. Notice too that the row of buildings to the right has exceptional detail into the distance. This is a primary result of HDR.
You should now have a pretty good idea what street photography is and what you can do with it. Don’t forget that the purpose is to photograph people on the street and develop the photos with HDR.
|


![Reblog this post [with Zemanta]](http://img.zemanta.com/reblog_e.png?x-id=58c4e989-f95f-4123-8188-902b3be4102d)


![Reblog this post [with Zemanta]](http://img.zemanta.com/reblog_a.png?x-id=5d5bfc9a-0a92-4575-9b35-a6a42eda9227)

![Reblog this post [with Zemanta]](http://img.zemanta.com/reblog_a.png?x-id=f800a84c-120f-4406-8cf6-c4d57ed92083)

![Reblog this post [with Zemanta]](http://img.zemanta.com/reblog_a.png?x-id=dccc56eb-1f5a-483e-a271-88ff421bbf69)

![Reblog this post [with Zemanta]](http://img.zemanta.com/reblog_a.png?x-id=45d667b9-6d1d-44c6-8f35-5801d034aaa6)


![Reblog this post [with Zemanta]](http://img.zemanta.com/reblog_a.png?x-id=519c2e9e-8a95-41ce-9fa5-3a8eefbe01d5)
![Reblog this post [with Zemanta]](http://img.zemanta.com/reblog_a.png?x-id=dd347867-312c-4428-8640-f49ac4dd1e53)
![Reblog this post [with Zemanta]](http://img.zemanta.com/reblog_a.png?x-id=a5d984e2-bff9-4a84-af0c-ca2afc6fca4e)
